AQS

CLH

CLH 锁是一种 基于链表的自旋锁,每个线程自旋的变量都是不同的(没有争抢同一个变量)

当前节点不断轮询前驱的状态,如果发现前驱释放了锁就结束自旋。

关于 CLH 相关知识比较完整的可以参考这篇文章

1
2
3
4
5
6
7
8
9
10
11
12
13
14
15
16
17
18
19
20
21
22
23
24
25
26
27
28
public class CLHLock {  
public static class CLHNode {
private volatile boolean isLocked = true; // 默认下一个线程需要等待锁
}

private volatile CLHNode tail;
private static final AtomicReferenceFieldUpdater<CLHLock, CLHNode> UPDATER =
AtomicReferenceFieldUpdater
. newUpdater(CLHLock.class, CLHNode.class , "tail" );

public void lock(CLHNode currentThread) {
CLHNode preNode = UPDATER.getAndSet( this, currentThread);
if(preNode != null) {//已有线程占用了锁,进入自旋
//noinspection StatementWithEmptyBody
while(preNode.isLocked);
}
}

public void unlock(CLHNode currentThread) {
// 这个判断似乎有点多余
if (UPDATER.compareAndSet(this, currentThread, null)) {
// 如果队列里只有当前线程,则释放对当前线程的引用(for GC)。
return;
}
// 还有后续线程
currentThread.isLocked = false ;// 改变状态,让后续线程结束自旋
}
}

AQS(AbstractQueuedSynchronizer)

AQS 其底层依赖于一个 同步队列 实现,该条件队列的结构类似 CLH 队列的变体。

我们先通过 AQS 中比较重要的属性以及内部类来了解其基本原理。

注意代码为了简洁会删减无关的东西

1
2
3
4
5
6
7
8
9
10
11
12
13
14
15
16
17
18
19
20
21
22
23
24
25
26
27
28
29
30
31
32
33
34
35
36
37
38
39
40
41
42
43
44
45
46
47
48
49
50
51
52
53
54
55
56
57
// AQS 作为一个框架提供。其子类可以是独占/共享、公平/非公平,子类应该被定义为非公共内部类
// {@link ReentrantLock.Sync}
public abstract class AbstractQueuedSynchronizer {

// 队列节点类,该队列是 “CLH” 锁队列的变体, 虽然 CLH 锁通常用于自旋锁
// 采用与 CLH 类似的策略,在前驱节点中保存当前节点的一些信息,每个线程会被包装在一个节点中
// 如果要加入同步队列,只需要尝试将节点变成新的尾部
// @see AbstractQueuedSynchronizer#addWaiter Call compareAndSetTail
// 如果节点位于同步队列中的第一个(不包括 head),则可能会尝试获取锁,如果成功则成为新的head
// @see AbstractQueuedSynchronizer#acquireQueued Call setHead
static final class Node {
// SIGNAL
// 当前节点在获取锁时发现前驱节点为该值,当前节点会 park 当前线程
// @see AbstractQueuedSynchronizer#acquireQueued Call shouldParkAfterFailedAcquire
// 当前节点在释放锁时发现当前节点不为 0,当前节点会 unpark 后续节点的线程
// @see AbstractQueuedSynchronizer#release Call unparkSuccessor
// CANCELLED
// 当前节点被取消
// CONDITION
// 当前节点正在条件队列中,直到条件改变前都不会加入同步队列。
// 条件队列只有独占模式的锁才会用到
// PROPAGATE
// 指示 releaseShared 应该传播到其他节点。
// 这是在 doReleaseShared 中设置的(仅适用于头节点),以确保传播继续
// 共享模式下使用
volatile int waitStatus;

volatile Node prev;
volatile Node next;
volatile Thread thread;
// 两种情况:
// 1. 条件队列中的下一个节点
// 2. 特殊值EXCLUSIVE/SHARED,因为只有在独占模式下才会使用到条件队列
// 所以可以通过该值指示共享模式
Node nextWaiter;
}

// 头结点
// 同步队列的头尾节点不会在初始就创建,而是在第一次发生争用时构造节点并设置
// 对于头结点,存在两种情况:
// 1.包装了当前持有锁的线程,这种情况比较显然,也就是在
// @see AbstractQueuedSynchronizer#acquireQueued Call setHead
// 2.假设有 thread1 第一次成功获取锁,此时没有争用,不需要 CLH 同步队列
// 然后 thread2 获取锁,产生争用,发现 head/tail 为空,于是初始化头尾并加入
// 后续自旋过程中更改前驱 head 的 waitStatus,阻塞等待 thread1 唤醒
// 此时的 head 并没有包装任何线程
// 但是 thread1 在释放锁时也会去判断 head 的 waitStatus
// @see AbstractQueuedSynchronizer#addWaiter Call initializeSyncQueue
private transient volatile Node head;

// 阻塞的尾节点,每个新的节点进来,都成为新的tail
private transient volatile Node tail;

// 当前锁的状态,0代表没有被占用,大于 0 代表锁重入的次数
// 注意与 Node#waitStatus 区分开来
private volatile int state;
}

ReentrantLock

Lock取代了synchronized方法和语句的使用,而Condition则取代了对象监视方法的使用

对于具体的 Lock ,大多情况下的用法为:

1
2
3
4
5
6
l.lock();  
try {
// access the resource protected by this lock
} finally {
l.unlock();
}

ReentrantLock 在内部基于 Sync 实现同步控制,而 Sync 正是 AQS 的一种具体实现。

我们以 ReentrantLock 的非公平锁为例,讲述 lock()unlock() 的整体流程

lock()

1
2
3
4
5
6
7
8
9
10
11
12
13
14
15
16
17
18
19
20
21
22
23
24
25
26
27
28
29
30
31
32
33
34
35
36
37
38
39
40
41
42
43
44
45
46
47
48
49
50
51
52
53
54
55
56
57
58
59
60
61
62
63
64
65
66
67
68
69
70
71
72
73
74
75
76
77
78
79
80
81
82
83
84
85
86
87
88
89
90
91
92
93
94
95
96
97
98
99
100
101
102
103
104
105
106
107
108
109
110
111
112
113
114
115
116
117
118
119
120
121
122
123
124
125
126
127
128
  public final void acquire(int arg) {
// 尝试获取锁, 如果获取成功免去队列操作
if (!tryAcquire(arg) &&
// addWaiter加入同步队列 acquireQueued直到成功获取锁返回, 返回值为中断状态
acquireQueued(addWaiter(Node.EXCLUSIVE), arg))
selfInterrupt();
}

...

protected final boolean tryAcquire(int acquires) {
return nonfairTryAcquire(acquires);
}
// 如果当前锁没被持有,尝试通过一次 CAS 更改状态为持有,整体操作轻量级
final boolean nonfairTryAcquire(int acquires) {
final Thread current = Thread.currentThread();
int c = getState();
if (c == 0) {
// 初步判断没有锁
// 当前线程尝试获取锁
if (compareAndSetState(0, acquires)) {
// 成功
setExclusiveOwnerThread(current);
return true;
}
} else if (current == getExclusiveOwnerThread()) {
// 重入
int nextc = c + acquires;
if (nextc < 0) // overflow
throw new Error("Maximum lock count exceeded"); // 溢出
setState(nextc);
return true;
}
// 失败
return false;
}

...

// 将当前结点加入到同步队列的尾部,mode = Node.EXCLUSIVE
private Node addWaiter(Node mode) {
// node 后继指向 mode
Node node = new Node(mode);

for (;;) {
// 不断尝试
Node oldTail = tail;
if (oldTail != null) {
// node 前驱指向 oldTail
node.setPrevRelaxed(oldTail);
// 尝试将当前结点设置为 tail
if (compareAndSetTail(oldTail, node)) {
// 成功
// oldTail 的后继指向 node
oldTail.next = node;
return node;
}
} else {
// 队列为空
initializeSyncQueue();
}
}
}

...

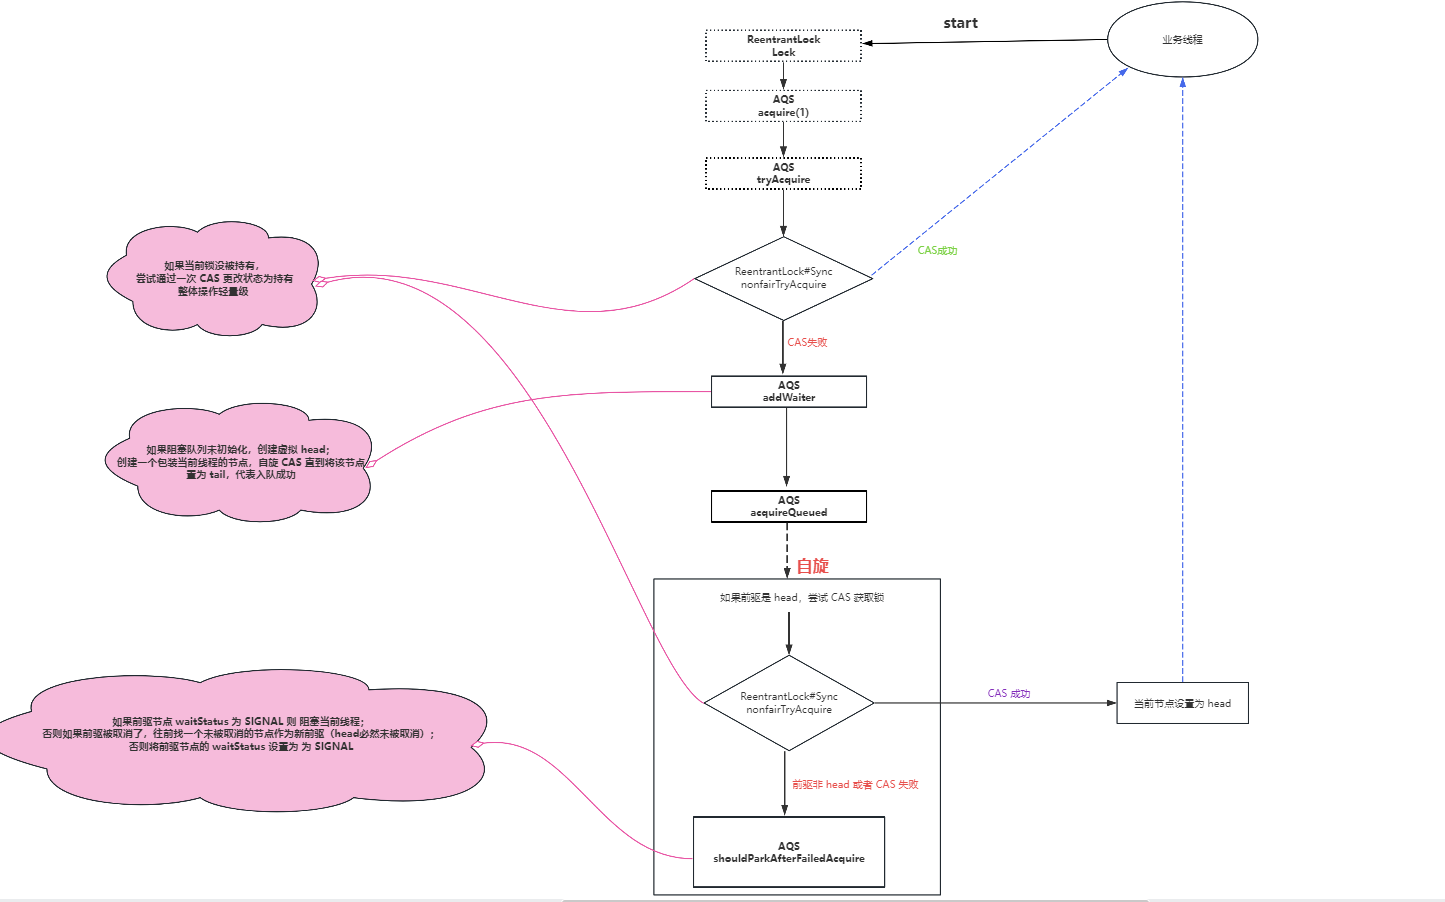
// 自旋
// 前驱为头节点时尝试获取锁
// 检查是否应该 park
// 返回值为中断状态
final boolean acquireQueued(final Node node, int arg) {
boolean interrupted = false;
try {
for (;;) {
// 前驱
final Node p = node.predecessor();
// 如果前驱是头节点,尝试获取锁
if (p == head && tryAcquire(arg)) {
// 当前线程持有锁,为新的头节点
setHead(node);
p.next = null; // help GC
return interrupted;
}
// 检查是否应该阻塞 (park)
if (shouldParkAfterFailedAcquire(p, node))
// 阻塞并且检测终端状态
interrupted |= parkAndCheckInterrupt();
}
} catch (Throwable t) {
cancelAcquire(node);
if (interrupted)
selfInterrupt();
throw t;
}
}

...

// 检查并更新获取失败的节点的状态。如果线程应该阻塞则返回 true。这是轮询中的主要信号控制
private static boolean shouldParkAfterFailedAcquire(Node pred, Node node) {
int ws = pred.waitStatus;
if (ws == Node.SIGNAL)
/*
* This node has already set status asking a release
* to signal it, so it can safely park.
*/
// 前驱已经设置状态为 SIGNAL,因此当前节点可以安全地停放。
return true;
if (ws > 0) {
/*
* 前驱被取消了,不断往前直到找到第一个未被取消的节点(头节点必然未被取消)
*/
do {
node.prev = pred = pred.prev;
} while (pred.waitStatus > 0);
pred.next = node;
} else {
/*
* waitStatus must be 0 or PROPAGATE. Indicate that we
* need a signal, but don't park yet. Caller will need to
* retry to make sure it cannot acquire before parking.
*/
// 尝试将前驱设置状态为 SIGNAL
// 前驱节点的 waitStatus=-1 依赖于后继节点设置
pred.compareAndSetWaitStatus(ws, Node.SIGNAL);
}
return false;
}

unlock()

unlock 的逻辑相对比较简单

1
2
3
4
5
6
7
8
9
10
11
12
13
14
15
16
17
18
19
20
21
22
23
24
25
26
27
28
29
30
31
32
33
34
35
36
37
38
39
40
41
42
43
44
45
46
47
48
49
50
51
52
53
54
55
56
57
58
59
60
61
62
63
64
65
66
67
68
69
public void unlock() {
sync.release(1);
}
public final boolean release(int arg) {
// 尝试释放锁,当计数器为 0 时成功
if (tryRelease(arg)) {
// 释放成功
// 使用 head, 无论 head 是否包装了当前线程
// (如果是第一次发生争抢,head 有可能是虚拟节点,也就是不包装任何线程)
// 唤醒后继
Node h = head;
if (h != null && h.waitStatus != 0)
unparkSuccessor(h);
return true;
}
return false;
}

...

// 释放锁,不会失败
protected final boolean tryRelease(int releases) {
int c = getState() - releases;
if (Thread.currentThread() != getExclusiveOwnerThread())
// 只有持有锁的线程才能释放锁
throw new IllegalMonitorStateException();
boolean free = false;
if (c == 0) {
// 计数器为 0 , 释放锁
free = true;
setExclusiveOwnerThread(null);
}
setState(c);
return free;
}

...

// unpark 后继节点,如果 后继节点被取消了或者为空 就从尾节点向前找第一个未被取消的
private void unparkSuccessor(Node node) {
/*
* If status is negative (i.e., possibly needing signal) try
* to clear in anticipation of signalling. It is OK if this
* fails or if status is changed by waiting thread.
*/
int ws = node.waitStatus;
if (ws < 0)
// 清除
node.compareAndSetWaitStatus(ws, 0);

/*
* Thread to unpark is held in successor, which is normally
* just the next node. But if cancelled or apparently null,
* traverse backwards from tail to find the actual
* non-cancelled successor.
*/
// unpark 后继节点。但如果后继被取消或者 **后继为null**
// 则从 **尾部向前** 遍历以找到实际的未取消后继者。
Node s = node.next;
if (s == null || s.waitStatus > 0) {
s = null;
for (Node p = tail; p != node && p != null; p = p.prev)
if (p.waitStatus <= 0)
s = p;
}
if (s != null)
// 唤醒后继节点
LockSupport.unpark(s.thread);
}

非公平锁

在调用 lock 时,两种锁都会先通过一次 CAS 也就是 tryAcquire 来尝试获取锁。

tryAcquire 方法中,如果发现锁这个时候被释放了(state == 0),非公平锁会直接 CAS 抢锁,返回 CAS 结果;但是公平锁会判断等待队列是否有线程处于等待状态,如果没有也是返回 CAS 结果,如果有则不去抢锁,直接返回失败。

后续的加解锁流程两者是没有区别的。

相对来说,非公平锁会有更好的性能,因为它的吞吐量比较大。当然,非公平锁让获取锁的时间变得更加不确定,可能会导致在阻塞队列中的线程长期处于饥饿状态。

Condition

Condition 需要与 Lock 结合使用。Condition 实例本质上绑定一个锁的实例,以下是 JDK11 给出的使用示例:

1
2
3
4
5
6
7
8
9
10
11
12
13
14
15
16
17
18
19
20
21
22
23
24
25
26
27
28
29
30
31
32
33
34
35
36
37
class BoundedBuffer<E> {
final Lock lock = new ReentrantLock();
final Condition notFull = lock.newCondition();
final Condition notEmpty = lock.newCondition();

final Object[] items = new Object[100];
int putptr, takeptr, count;

public void put(E x) throws InterruptedException {
lock.lock();
try {
while (count == items.length)
notFull.await();
items[putptr] = x;
if (++putptr == items.length) putptr = 0;
++count;
notEmpty.signal();
} finally {
lock.unlock();
}
}

public E take() throws InterruptedException {
lock.lock();
try {
while (count == 0)
notEmpty.await();
E x = (E) items[takeptr];
if (++takeptr == items.length) takeptr = 0;
--count;
notFull.signal();
return x;
} finally {
lock.unlock();
}
}
}

注意事项:

  • 当等待Condition时,通常允许发生“虚假唤醒”,因此Condition应该始终在循环中等待,测试正在等待的状态谓词。

在上面的示例中,newCondition 最终会调用到

1
2
3
final ConditionObject newCondition() {
return new ConditionObject();
}

AQS 中的内部类 ConditionObjectCondtion 的一个具体实现,其底层同样依赖于一个条件队列,该条件队列的结构同样类似 CLH 队列的变体。

条件队列中的节点 Node 实际上和同步队列中的 Node 是同一个类,只是条件队列和同步队列用到的属性有所不同,而也正是因为是同一个类,所以才能实现在 signal 唤醒时,可以直接将 Node 从条件队列中转移到同步队列,注意 Node 在同一时刻只会处于一个队列中。

我们先了解该类的一些重要字段

1
2
3
4
5
6
public class ConditionObject implements Condition{
/** 条件队列的第一个节点 */
private transient Node firstWaiter;
/** 条件队列的最后一个节点 */
private transient Node lastWaiter;
}

实际上该类中只存在两个重要的字段,再回过头看先前 Node 提到的相关属性

1
2
3
4
5
6
7
8
9
10
11
12
13
14
15
16
17
18
19
public abstract class AbstractQueuedSynchronizer{
static final class Node {
// ...
// CONDITION
// 当前节点正在条件队列中,直到条件改变前都不会加入同步队列
volatile int waitStatus;

// 注意如果该节点如果位于条件队列,那么 prev 和 next 都为空。
// 也就是说这两个字段只有在节点位于同步队列时会赋值
volatile Node prev;
volatile Node next;

// 两种情况:
// 1. 条件队列中的下一个节点
// 2. 特殊值EXCLUSIVE/SHARED,因为只有在独占模式下才会使用到条件队列
// 所以可以通过该值指示共享模式
Node nextWaiter;
}
}

下面以 awaitsignal 为例,讲述 Condition 的工作原理。

需要注意的是不会有线程问题,因为只有持有锁的线程可以 awaitsignal

await

1
2
3
4
5
6
7
8
9
10
11
12
13
14
15
16
17
18
19
20
21
22
23
24
25
26
27
28
29
30
31
32
33
34
35
36
37
38
39
40
41
42
43
44
45
46
47
48
49
50
51
52
53
54
55
56
57
58
59
60
61
62
63
64
65
66
67
68
69
70
71
72
73
74
75
76
77
78
79
80
81
82
83
public final void await() throws InterruptedException {
if (Thread.interrupted())
throw new InterruptedException();
// 加入条件队列
Node node = addConditionWaiter();
// 完全释放锁(不管重入几次)并唤醒同步队列的后继节点,保存释放前的 state
int savedState = fullyRelease(node);
int interruptMode = 0;
// 阻塞直到其他线程通过 signal 将该节点转移到同步队列或者被中断
while (!isOnSyncQueue(node)) {
LockSupport.park(this);
if ((interruptMode = checkInterruptWhileWaiting(node)) != 0)
break;
}
// 通过 savedState 重新自旋以获取锁,此时的节点已经在 signal 时被传输到同步队列中
if (acquireQueued(node, savedState) && interruptMode != THROW_IE)
interruptMode = REINTERRUPT;
if (node.nextWaiter != null) // clean up if cancelled
// 遍历删除所有取消的节点
unlinkCancelledWaiters();
// 报告中断
if (interruptMode != 0)
reportInterruptAfterWait(interruptMode);
}

...

// 添加一个新的节点到条件队列中
private Node addConditionWaiter() {
if (!isHeldExclusively())
throw new IllegalMonitorStateException();
Node t = lastWaiter;
// If lastWaiter is cancelled, clean out.
// 遍历删除所有取消的节点
if (t != null && t.waitStatus != Node.CONDITION) {
unlinkCancelledWaiters();
t = lastWaiter;
}
// 新建一个node,这里没有复用同步队列中 node ,原因后文再解释
Node node = new Node(Node.CONDITION);
// 加入条件队列
if (t == null)
firstWaiter = node;
else
t.nextWaiter = node;
lastWaiter = node;
return node;
}

...

fullyRelease() // 完全释放锁。该方法调用到的 release 在前文中的 unlock 有提到,不再赘述

...

// 返回节点是否已经被转移到同步队列。由其他线程通过 signal 将该节点转移到同步队列
final boolean isOnSyncQueue(Node node) {
if (node.waitStatus == Node.CONDITION || node.prev == null)
// 如果 waitStatus 为 CONDITION
// 或者 prev 为空的话(因为如果在同步队列的话后继可能为空,
// 但是 prev 一定不为空,因为有 head)
// 就必然还在条件队列中
return false;
if (node.next != null) // If has successor, it must be on queue
// 如果 next 不为空,就必然在同步队列
// 条件队列的后继用的是 Node#nextWaiter 字段,不会用 next
return true;
/*
* node.prev can be non-null, but not yet on queue because
* the CAS to place it on queue can fail. So we have to
* traverse from tail to make sure it actually made it. It
* will always be near the tail in calls to this method, and
* unless the CAS failed (which is unlikely), it will be
* there, so we hardly ever traverse much.
*/
// 从尾部开始遍历同步队列并比较,确保确实成功了
// 这是因为当 node.prev 不为空时,可能由于 CAS 失败导致暂时还未加入同步队列成功
return findNodeFromTail(node);
}

...

acquireQueued(node, savedState) // 自旋获取锁,该方法在前文中的 lock 有提到,不再赘述

注意Node 只在被 signal 唤醒时做了复用,从条件队列转移到同步队列中,也就是后文提到的 ConditionObject#doSignal Call transferForSignal

但是在这里当被 await 需要加入到条件队列时,ConditionObject 的做法是先新建一个 Node 加入条件队列,然后调用 release 去释放锁,没有选择复用 Node

这么做的原因其实是同步队列还需要原先的节点 (其实就是 head) ,我们回想前文同步队列的相关知识,当线程释放锁时,唤醒后继节点,相当于后继节点获得了 CAS 争用锁的资格,但实际上争用的这个动作不是发生在当前线程,并且是否成功或者哪个线程成功,哪个节点作为新的 head ,其实都是未定且未发生的,也就是说异步发生的,所以在这个时候还是需要保留先前的 head 节点。

signal

signal 的过程比较简单一点

1
2
3
4
5
6
7
8
9
10
11
12
13
14
15
16
17
18
19
20
21
22
23
24
25
26
27
28
29
30
31
32
33
34
35
36
37
38
39
40
41
42
43
44
45
46
public final void signal() {
if (!isHeldExclusively())
throw new IllegalMonitorStateException();
Node first = firstWaiter;
if (first != null)
doSignal(first);
}

...

// 尝试将条件队列的第一个节点进行转移,如果失败的话就向后面的节点尝试
private void doSignal(Node first) {
do {
if ( (firstWaiter = first.nextWaiter) == null)
lastWaiter = null;
first.nextWaiter = null;
} while (!transferForSignal(first) &&
(first = firstWaiter) != null);
}

...

// 将节点从条件队列转移到同步队列。如果成功则返回 true。
final boolean transferForSignal(Node node) {
/*
* If cannot change waitStatus, the node has been cancelled.
*/
// 清除条件状态
if (!node.compareAndSetWaitStatus(Node.CONDITION, 0))
return false;

/*
* Splice onto queue and try to set waitStatus of predecessor to
* indicate that thread is (probably) waiting. If cancelled or
* attempt to set waitStatus fails, wake up to resync (in which
* case the waitStatus can be transiently and harmlessly wrong).
*/
// 加入同步队列,返回其前驱节点
Node p = enq(node);
int ws = p.waitStatus;
// 将前驱的状态设置为 SIGNAL ,以让其唤醒该节点的线程
if (ws > 0 || !p.compareAndSetWaitStatus(ws, Node.SIGNAL))
// 如果前驱被取消了或者状态设置失败,由当前线程唤醒该节点的线程
LockSupport.unpark(node.thread);
return true;
}

CountDownLatch

CountDownLatch 是共享模式下的锁,且计数无法被重置。

先了解 JDK11 给出的使用示例

1
2
3
4
5
6
7
8
9
10
11
12
13
14
15
16
17
18
19
20
21
22
23
24
25
26
27
28
29
30
31
32
33
34
35
36
37
38
39
40
41
42
43
44
class Driver {

public static void main(String[] args) throws InterruptedException {
int N = 10;
CountDownLatch startSignal = new CountDownLatch(1);
CountDownLatch doneSignal = new CountDownLatch(N);
for (int i = 0; i < N-2; ++i){ // create and start threads
new Thread(new Worker(startSignal, doneSignal)).start();
}

doSomethingElse(); //don't let run yet
startSignal.countDown(); // let all threads proceed
doSomethingElse();
doneSignal.await(); //wait for all to finish
}

private static void doSomethingElse() {}


static class Worker implements Runnable {
private final CountDownLatch startSignal;
private final CountDownLatch doneSignal;

Worker(CountDownLatch startSignal, CountDownLatch doneSignal) {
this.startSignal = startSignal;
this.doneSignal = doneSignal;
}

public void run() {
try {
startSignal.await();
doWork();
doneSignal.countDown();
} catch (InterruptedException ex) {
// do something
}
System.out.println(111);
}

void doWork() {}
}

}

CountDownLatch 构造方法传入的计数,实际上该计数最后会被设置到 AQS#state 中。而每次调用 countDown() 就会将 state 减 1 ,直到计数归 0 ,代表锁释放。

下面以 awaitcountDown 为例,讲述 CountDownLatch 的工作原理

await

1
2
3
4
5
6
7
8
9
10
11
12
13
14
15
16
17
18
19
20
21
22
23
24
25
26
27
28
29
30
31
32
33
34
35
36
37
38
39
40
41
42
43
44
45
46
47
48
49
50
51
52
53
54
55
56
57
58
59
60
61
62
63
64
65
66
67
68
69
70
71
72
73
74
75
// 导致当前线程等待,直到计数器归零。除非线程被中断,如果当前计数为零,则此方法立即返回
// 调用countDown方法可以使计数减一
public void await() throws InterruptedException {
sync.acquireSharedInterruptibly(1);
}

// 以共享模式获取
// 类似 lock 的流程,会先通过一次简单的尝试检查计数器是否已经为0
// 成功的话直接返回
// 失败的话再自旋入队或者阻塞
public final void acquireSharedInterruptibly(int arg)
throws InterruptedException {
if (Thread.interrupted())
throw new InterruptedException();
// 尝试
if (tryAcquireShared(arg) < 0)

doAcquireSharedInterruptibly(arg);
}

...

// 简单的检查计数器是否已经为 0
protected int tryAcquireShared(int acquires) {
return (getState() == 0) ? 1 : -1;
}

...

// 流程类似 lock 中的 acquireQueued
// 新建一个共享模式的节点,加入到同步队列中
// 如果节点的前驱是头节点,检查计数器是否已经为0
// 如果为 0 则设置头节点并向后传播
// 如果前驱不是头节点或者计数不为 0
// 检查是否应该阻塞
private void doAcquireSharedInterruptibly(int arg)
throws InterruptedException {
// 新建一个共享模式的节点,加入到同步队列中,参考 lock
final Node node = addWaiter(Node.SHARED);
try {
for (;;) {
final Node p = node.predecessor();
if (p == head) {
// 如果节点的前驱是头节点,检查计数器是否已经为0
int r = tryAcquireShared(arg);
if (r >= 0) {
// 设置头节点并向后传播
setHeadAndPropagate(node, r);
p.next = null; // help GC
return;
}
}
// 如果前驱不是头节点或者计数不为 0
// 检查是否应该阻塞
if (shouldParkAfterFailedAcquire(p, node) &&
// 阻塞并且检查中断
parkAndCheckInterrupt())
throw new InterruptedException();
}
} catch (Throwable t) {
cancelAcquire(node);
throw t;
}
}

...

// 设置头节点并向后传播
setHeadAndPropagate(node, r); // 该方法主要调用了 doReleaseShared
// 而对于 doReleaseShared 在 countDown 流程中提到,参考下文

...

shouldParkAfterFailedAcquire() // 检查是否应该阻塞的方法复用了 lock 中的相同方法,参考前文

countDown

1
2
3
4
5
6
7
8
9
10
11
12
13
14
15
16
17
18
19
20
21
22
23
24
25
26
27
28
29
30
31
32
33
34
35
36
37
38
39
40
41
// 递减锁存器的计数,如果计数达到零,则释放所有等待线程。如果计数器在递减前就为0,则什么都不会做
public void countDown() {
sync.releaseShared(1);
}
// 在共享模式下释放
public final boolean releaseShared(int arg) {
// CAS 设置计数减一,当减一后计数为 0 时返回 true。比较简单,略
if (tryReleaseShared(arg)) {
// 计数到达0
// 在共享模式下释放:唤醒后继节点并向后传播
doReleaseShared();
return true;
}
return false;
}

...

// 在共享模式下释放:唤醒后继节点并向后传播
private void doReleaseShared() {
// 通过循环以防在执行此操作时添加新节点。
for (;;) {
Node h = head;
if (h != null && h != tail) {
int ws = h.waitStatus;

// 如果 ws == SIGNAL,说明存在后继节点,则尝试以取消后继节点的方式进行传播
if (ws == Node.SIGNAL) {
if (!h.compareAndSetWaitStatus(Node.SIGNAL, 0))
continue; // loop to recheck cases
unparkSuccessor(h);
}
// 如果没有后继节点,状态将设置为 PROPAGATE 以确保后续能够继续传播
else if (ws == 0 &&
!h.compareAndSetWaitStatus(0, Node.PROPAGATE))
continue; // loop on failed CAS
}
if (h == head) // loop if head changed
break;
}
}

CyclicBarrier

先给出一个使用示例:

1
2
3
4
5
6
7
8
9
10
11
12
13
14
15
16
17
18
19
20
21
22
23
24
25
26
27
28
public class CyclicBarrierDemo {
private static CyclicBarrier cb;

public static void main(String[] args) throws Exception {
cb = new CyclicBarrier(3, () ->
System.out.println(Thread.currentThread().getName() + " barrier action"));
for (int i = 0; i < 2; i++) {
new WorkerThread().start();
}
System.out.println(Thread.currentThread().getName() + " going to await");
cb.await();
System.out.println(Thread.currentThread().getName() + " continue");

}


static class WorkerThread extends Thread {
public void run() {
System.out.println(Thread.currentThread().getName() + " going to await");
try {
cb.await();
System.out.println(Thread.currentThread().getName() + " continue");
} catch (Exception e) {
e.printStackTrace();
}
}
}
}

CyclicBarrier 内部借助一个 ReentrantLock 和一个该 ReentrantLockCondition 实现。

每次调用 await(),会先获取该 ReentrantLock.lock(),然后将计数减一(无需 CAS,因为此时持有锁,是线程安全的)

  • 如果未归 0,则通过 Condition.await() 让出该锁并阻塞;
  • 如果归0,则通过 Condition.signalAll() 唤醒先前所有阻塞的线程,并且重置计数器(也就是说 CyclicBarrier 是可以重用的)。

AQS
https://wecgwm.github.io/2024/01/27/AQS/
作者
yichen
发布于
2024年1月27日
许可协议